完成形です。いぇい。
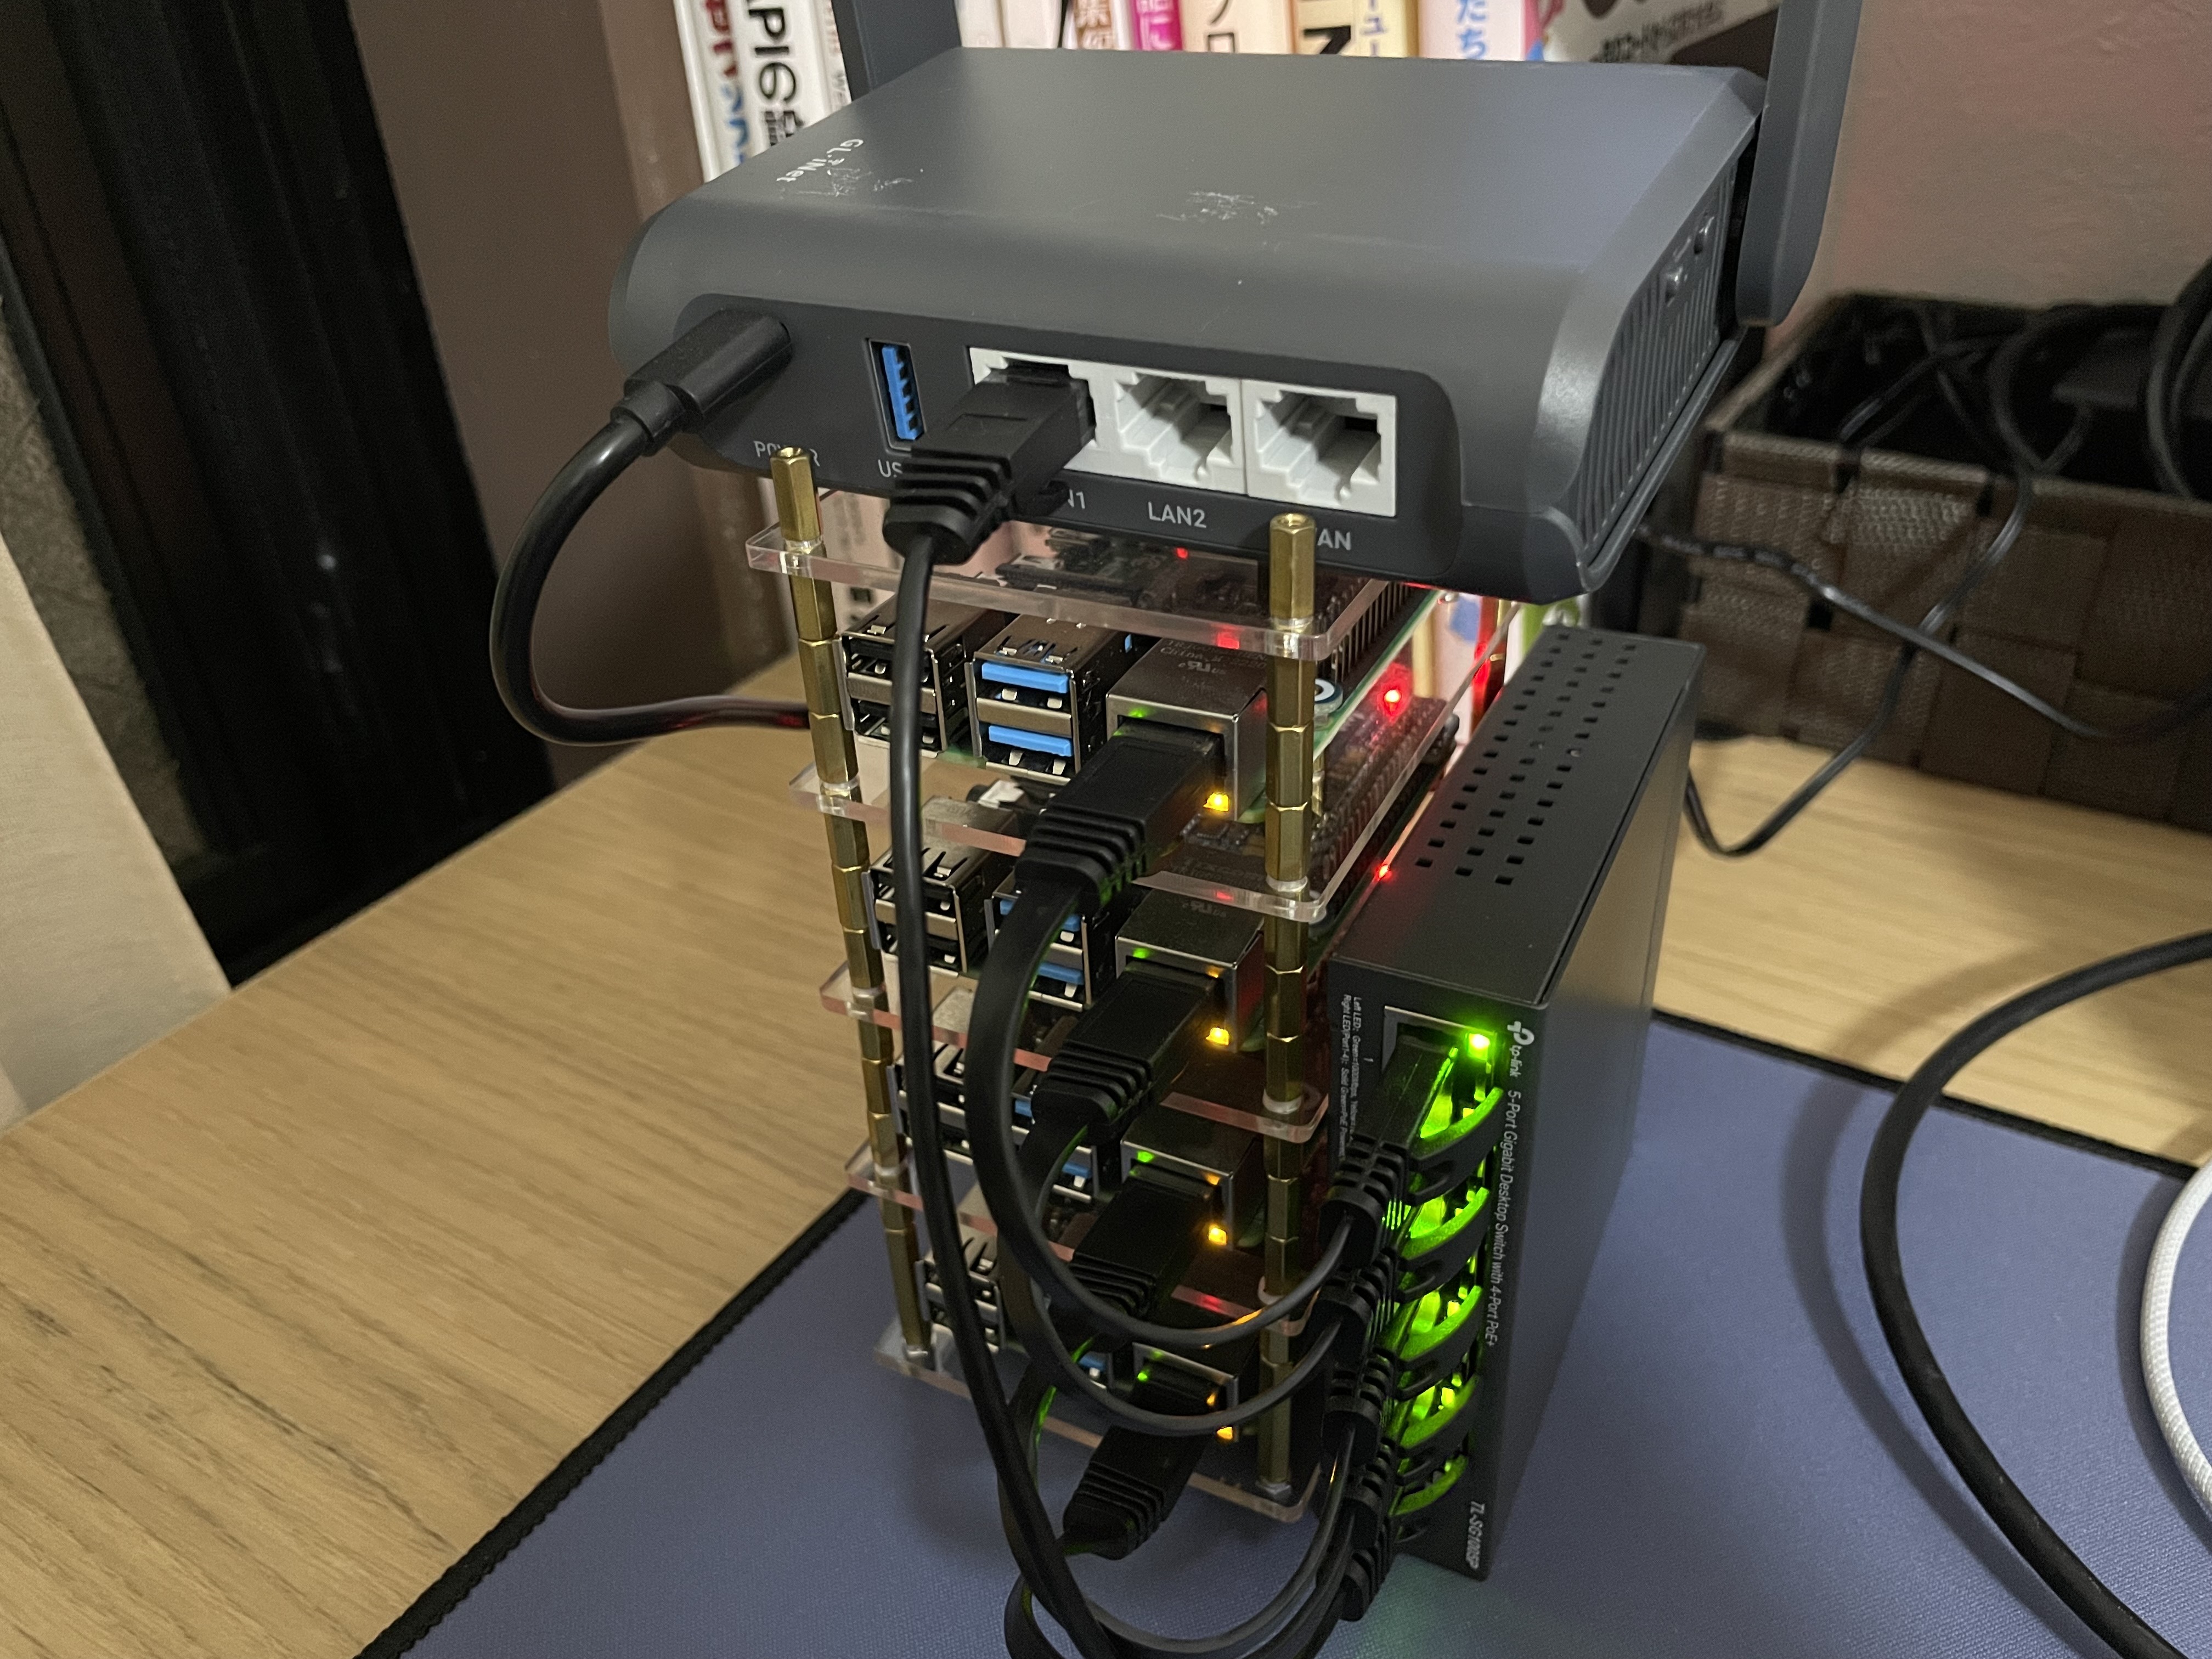
材料
| 材料 | 個数 |
|---|---|
| Raspberry Pi 4 Model B 8GB | 4 |
| PoE HAT(E) | 4 |
| PoE対応 スイッチングハブ | 1 |
| 無線ルーター | 1 |
| MicroSD 128GB | 4 |
| LAN (0.15m) | 4 |
| LAN (0.3m) | 1 |
| ケース | 1 |
| 追加スペーサー | 50個入り |
組み立ての感想
見た目をスッキリさせたかったので、ラズパイの電源は PoE HATによりハブからLANで取ってます。
ただ、これだとLANを引っこ抜いてノードを切り離すことが出来ないので失敗したかなって思ってます。
LAN引っこ抜いてノードネットワーク障害ごっこしたいのに、電源も落ちちゃう。
cf. PoE (Power Over Ethernet)。
また、ケースでもPoE HATで失敗しました。
PoE HATを付けると高さが高くなります。(値段も)
買ったケースのファンとPoE HATのIsolation Transformerがぶつかります。
なので、ケース付属スペーサーだけでは足りないのでスペーサーを買い足しました。
(そして、そのスペーサーが付属スペーサーのネジ径と合わない…。付属のはM2だったっぽい…。)
付属スペーサーは高さ20mm。このケース(+ファン) + PoE HAT の場合、30mmでぴったり合います。
Amazonで激安のPoE HATはさらに高くなるので、ご注意を。
k8s cluster 構築
0. 別PCでの準備
- 無線ルーターを中継機として既存LANに参加させます。
- Raspberry Pi Imagerを使ってmicroSDカード4枚にRaspberry Pi OS(64-bit) Liteを書き込みます。
- Imagerでホスト名やssh有効化、user/passwd設定等出来るのでここでやっても可。
中継機が192.168.8.1なので、192.168.8.xで4台に固定IPを割り当てていきます。
- 192.168.8.101 … rp1 コントロールプレーン
- 192.168.8.102 … rp2 ワーカーノード
- 192.168.8.103 … rp3 ワーカーノード
- 192.168.8.104 … rp4 ワーカーノード
1. ホスト名設定
$ sudo vi /etc/hostname
rpx   # <- xには識別番号
$ sudo vi /etc/hosts
...
127.0.0.1 rpx

192.168.8.101 rp1 # <- あとでIPアドレスを固定
192.168.8.102 rp2
192.168.8.103 rp3
192.168.8.104 rp4
$ reboot
2. インターネット接続 & timezone
$ sudo raspi-config
1 System Options > S1 Wireless LAN
JPを選択- SSIDを入力
- アクセスポイントのパスワードを入力
5 localisation options>L2 Timezone>Asia>Tokyoを選択
WLANで一度国を選択すると次から国の選択が出てきませんでした。
後述するファイルに国コードcontryをJPに修正することで対応出来ます。
3. Tailscale
Install with one commandからインストールします。
$ curl -fsSL https://tailscale.com/install.sh | sh
...
Installation complete! log in to start using Tailscale by running:

sudo tailscale up
$ sudo tailscale up --ssh # <-- tailscale sshを有効に。

to Authenticate, visit:

    https://login.tailscale.com/a/xxxxxxxx
このURLを入れるのが一番しんどかったです。
(上記URLへアクセスし認証を通せばいいので、写真撮ってOCRからiPhoneでアクセスしました。fが£になるのが辛かった。)
tailscaleのadminコンソールに表示されるホスト名は、クライアントPC側でホスト名を変更したら更新されます。
ラズパイに設定するホスト名でtailscaleでも管理したいので特に触らない。
admin consoleから接続した端末に対して disable key expiry 。
これ以降はtailscale ssh で接続して作業します。
(weztermがpaneのsyncronizeしない/必要に感じてないそうなので、tmuxでやっていきます。)
4. リポジトリ&パッケージ更新
sudo apt update
sudo apt upgrade -y
5. IPアドレス固定
$ sudo vi /etc/dhcpcd.conf
...
# Example static IP configuration:
interface eth0
static ip_address=192.168.8.10x/24
static routers=192.168.8.1
static domain_name_servers=192.168.8.1 8.8.8.8

...
6. kubeadmの必要要件を満たす
kubeadmのインストールを 始める前にに記載があるので設定する
6.1. swap無効化
システムに応じたswapの無効化をしてくれよな!って書いてある。
Raspberry Pi OSの場合、/etc/fstabを見ると dphys-swapfile swap[on|off]使ってくれよな!って書いてあった。
$ sudo swapon   # 現状確認
NAME      TYPE SIZE USED PRIO
/var/swap file 100M.  0B.  -2

$ sudo dphys-swapfile swapoff
$ sudo systemctl stop dphys-swapfile
$ sudo systemctl disable dphys-swapfile

# 設定確認
$ sudo swapon
$ #設定なし
6.2. cgroupのmemory有効化
$ cat /proc/cgroups   # 現状確認
#subsys_name    hierarchy       num_cgroups     enabled
cpuset  0       80      1
cpu     0       80      1
cpuacct 0       80      1
blkio   0       80      1
memory  0       80      0   <-- 無効になってる
devices 0       80      1
freezer 0       80      1
net_cls 0       80      1
perf_event      0       80      1
net_prio        0       80      1
pids    0       80      1
# 有効化(末尾にcgroup_enable=cpuset cgroup_memory=1 cgroup_enable=memoryを追加)
$ sudo sed -i "s/$/ cgroup_enable=cpuset cgroup_memory=1 cgroup_enable=memory/" /boot/firmware/cmdline.txt
$ sudo reboot
7. containerd/runc/CNI pluginsのインストール + α
コンテナランタイムとしてcontainerdを使用します。
docker engineを使用しても引き続きk8sは動くようですが、必要最小限の構成にしたいためです。
Getting started with containerdに従います。
7.1. containerd
執筆時点のaptだとv1.4.13が降ってきて、cgroup API v1を使おうとしますが、 他ツールではcgroup API v2を使うバージョンが降ってきます。
結果、cgroup APIのバージョンが違うじゃねーかってkubeletに怒られるのでここではcontainerdのバージョンを指定できる方法でインストールします。
GitHub Release: containerd/containerd
$ # containerdのインストール
$ containerd_version="1.7.14"
$ curl -fsSL -o /tmp/containerd.tar.gz https://github.com/containerd/containerd/releases/download/v${containerd_version}/containerd-${containerd_version}-linux-arm64.tar.gz
$ sudo tar Cxzvf /usr/local /tmp/containerd.tar.gz
$ rm /tmp/containerd.tar.gz
$ # systemdに登録
$ sudo mkdir -p /usr/local/lib/systemd/system
$ sudo curl https://raw.githubusercontent.com/containerd/containerd/main/containerd.service -o /usr/local/lib/systemd/system/containerd.service
$ sudo systemctl daemon-reload
$ sudo systemctl enable --now containerd
7.2. runc
GitHub Release: opencontainers/runc
$ runc_version="1.1.12"
$ curl -fsSL -o /tmp/runc https://github.com/opencontainers/runc/releases/download/v${runc_version}/runc.arm64
$ sudo install -m 755 /tmp/runc /usr/local/sbin/runc
$ rm /tmp/runc
7.3. CNI plugins
$ cni_plugins_version="1.4.0"
$ sudo mkdir -p /opt/cni/bin
$ curl -fsSL -o /tmp/cni-plugins.tgz https://github.com/containernetworking/plugins/releases/download/v${cni_plugins_version}/cni-plugins-linux-arm-v${cni_plugins_version}.tgz
$ sudo tar Cxzvf /opt/cni/bin /tmp/cni-plugins.tgz
$ rm /tmp/cni-plugins.tgz
7.4. IPv4フォワーディングを有効化し、iptablesからブリッジされたトラフィックを見えるようにする
こちらの設定に従います。
(わかってないので後で調べる。)
$ cat <<EOF | sudo tee /etc/modules-load.d/k8s.conf
overlay
br_netfilter
EOF

$ sudo modprobe overlay
$ sudo modprobe br_netfilter
# モジュールが読み込まれていることを確認
$ lsmod | grep br_netfilter
$ lsmod | grep overlay
# この構成に必要なカーネルパラメーター、再起動しても値は永続します
$ cat <<EOF | sudo tee /etc/sysctl.d/k8s.conf
net.bridge.bridge-nf-call-iptables = 1
net.bridge.bridge-nf-call-ip6tables = 1
net.ipv4.ip_forward = 1
EOF

# 再起動せずにカーネルパラメーターを適用
$ sudo sysctl --system

# 各カーネルパラメータがて1に設定されていることを確認
$ sysctl net.bridge.bridge-nf-call-iptables net.bridge.bridge-nf-call-ip6tables net.ipv4.ip_forward
7.5. cgroupドライバーにsystemdを設定
初期設定ファイルを出力してsystemdを指定する。 (公式に沿うならファイル開いて場所を確認した方がいい。)
$ sudo mkdir -p /etc/containerd
$ containerd config default | sed "s/SystemdCgroup = false/SystemdCgroup = true/" | sudo tee /etc/containerd/config.toml
$ sudo systemctl restart containerd
8. kubeadm / kubelet / kubectl のインストール
公式の手順に沿う
# 1. `apt`のパッケージ一覧を更新し、Kubernetesの`apt`リポジトリを利用するのに必要なパッケージをインストールします:
$ sudo apt-get install -y apt-transport-https ca-certificates curl

# 2. Google Cloudの公開鍵をダウンロードします:
# `/etc/apt/keyrings`フォルダーが存在しない場合は、curlコマンドの前に作成する必要があります。下記の備考を参照してください。
# sudo mkdir -p -m 755 /etc/apt/keyrings
curl -fsSL https://pkgs.k8s.io/core:/stable:/v1.29/deb/Release.key | sudo gpg --dearmor -o /etc/apt/keyrings/kubernetes-apt-keyring.gpg

# 3. Kubernetesの`apt`リポジトリを追加します:
echo 'deb [signed-by=/etc/apt/keyrings/kubernetes-apt-keyring.gpg] https://pkgs.k8s.io/core:/stable:/v1.29/deb/ /' | sudo tee /etc/apt/sources.list.d/kubernetes.list

# 4. `apt`のパッケージ一覧を更新し、kubelet、kubeadm、kubectlをインストールします。そしてバージョンを固定します:
$ sudo apt-get update
$ sudo apt-get install -y kubelet kubeadm kubectl
$ sudo apt-mark hold kubelet kubeadm kubectl
8.1. kubeletで使用されるcgroupドライバーにsystemdを指定
$ sudo mkdir /var/lib/kubelet
$ echo "KUBELET_EXTRA_ARGS=--cgroup-driver=systemd" | sudo tee /var/lib/kubelet/kubeadm-flags.env
$ sudo systemctl daemon-reload
$ sudo systemctl restart kubelet
8.2. k8sクラスタ作成 (コントロールプレーンノードでのみ)
$ sudo kubeadm init --pod-network-cidr=10.244.0.0/16 --control-plane-endpoint=rp1 --apiserver-cert-extra-sans=rp1
[init] Using Kubernetes version: v1.29.3
[preflight] Running pre-flight checks
   [WARNING SystemVerification]: missing optional cgroups: hugetlb
[preflight] Pulling images required for setting up a Kubernetes cluster
[preflight] This might take a minute or two, depending on the speed of your internet connection
[preflight] You can also perform this action in beforehand using 'kubeadm config images pull'
W0318 00:26:16.828739    1050 checks.go:835] detected that the sandbox image "registry.k8s.io/pause:3.8" of the container runtime is inconsistent with that used by kubeadm. It is recommended that using "registry.k8s.io/pause:3.9" as the CRI sandbox image.
[certs] Using certificateDir folder "/etc/kubernetes/pki"
[certs] Generating "ca" certificate and key
[certs] Generating "apiserver" certificate and key
[certs] apiserver serving cert is signed for DNS names [kubernetes kubernetes.default kubernetes.default.svc kubernetes.default.svc.cluster.local rp1] and IPs [10.96.0.1 192.168.8.101]
[certs] Generating "apiserver-kubelet-client" certificate and key
[certs] Generating "front-proxy-ca" certificate and key
[certs] Generating "front-proxy-client" certificate and key
[certs] Generating "etcd/ca" certificate and key
[certs] Generating "etcd/server" certificate and key
[certs] etcd/server serving cert is signed for DNS names [localhost rp1] and IPs [192.168.8.101 127.0.0.1 ::1]
[certs] Generating "etcd/peer" certificate and key
[certs] etcd/peer serving cert is signed for DNS names [localhost rp1] and IPs [192.168.8.101 127.0.0.1 ::1]
[certs] Generating "etcd/healthcheck-client" certificate and key
[certs] Generating "apiserver-etcd-client" certificate and key
[certs] Generating "sa" key and public key
[kubeconfig] Writing "admin.conf" kubeconfig fileetes"
[kubeconfig] Writing "super-admin.conf" kubeconfig file
[kubeconfig] Writing "kubelet.conf" kubeconfig file
[kubeconfig] Writing "controller-manager.conf" kubeconfig file
[kubeconfig] Writing "scheduler.conf" kubeconfig file
[etcd] Creating static Pod manifest for local etcd in "/etc/kubernetes/manifests"
[control-plane] Using manifest folder "/etc/kubernetes/manifests"
[control-plane] Creating static Pod manifest for "kube-apiserver"
[control-plane] Creating static Pod manifest for "kube-controller-manager"
[control-plane] Creating static Pod manifest for "kube-scheduler"
[kubelet-start] Writing kubelet environment file with flags to file "/var/lib/kubelet/kubeadm-flags.env"
[kubelet-start] Writing kubelet configuration to file "/var/lib/kubelet/config.yaml"
[kubelet-start] Starting the kubelet
[wait-control-plane] Waiting for the kubelet to boot up the control plane as static Pods from directory "/etc/kubernetes/manifests". This can take up to 4m0s
[apiclient] All control plane components are healthy after 14.505609 seconds
[upload-config] Storing the configuration used in ConfigMap "kubeadm-config" in the "kube-system" Namespace
[kubelet] Creating a ConfigMap "kubelet-config" in namespace kube-system with the configuration for the kubelets in the cluster
[upload-certs] Skipping phase. Please see --upload-certs
[mark-control-plane] Marking the node rp1 as control-plane by adding the labels: [node-role.kubernetes.io/control-plane node.kubernetes.io/exclude-from-external-load-balancers]
[mark-control-plane] Marking the node rp1 as control-plane by adding the taints [node-role.kubernetes.io/control-plane:NoSchedule]
[bootstrap-token] Using token: n3np0b.isp8nf8rjz4cyfqt
[bootstrap-token] Configuring bootstrap tokens, cluster-info ConfigMap, RBAC Roles
[bootstrap-token] Configured RBAC rules to allow Node Bootstrap tokens to get nodes
[bootstrap-token] Configured RBAC rules to allow Node Bootstrap tokens to post CSRs in order for nodes to get long term certificate credentials
[bootstrap-token] Configured RBAC rules to allow the csrapprover controller automatically approve CSRs from a Node Bootstrap Token
[bootstrap-token] Configured RBAC rules to allow certificate rotation for all node client certificates in the cluster
[bootstrap-token] Creating the "cluster-info" ConfigMap in the "kube-public" namespace
[kubelet-finalize] Updating "/etc/kubernetes/kubelet.conf" to point to a rotatable kubelet client certificate and key
[addons] Applied essential addon: CoreDNS
[addons] Applied essential addon: kube-proxy
Your Kubernetes control-plane has initialized successfully!

To start using your cluster, you need to run the following as a regular user:

  mkdir -p $HOME/.kube
  sudo cp -i /etc/kubernetes/admin.conf $HOME/.kube/config
  sudo chown $(id -u):$(id -g) $HOME/.kube/config

Alternatively, if you are the root user, you can run:

  export KUBECONFIG=/etc/kubernetes/admin.conf

You should now deploy a pod network to the cluster.
Run "kubectl apply -f [podnetwork].yaml" with one of the options listed at:
  https://kubernetes.io/docs/concepts/cluster-administration/addons/

You can now join any number of control-plane nodes by copying certificate authorities
and service account keys on each node and then running the following as root:

  kubeadm join rp1:6443 --token n3np0b.isp8nf8rjz4cyfqt \
   --discovery-token-ca-cert-hash sha256:<hash> \
   --control-plane

Then you can join any number of worker nodes by running the following on each as root:

kubeadm join rp1:6443 --token n3np0b.isp8nf8rjz4cyfqt \
   --discovery-token-ca-cert-hash sha256:<hash>
8.3. k8sクラスタへの参加
コントロールプレーンに参加するコマンドとワーカーノードに参加するコマンドが表示されます。
残り3台はワーカーノードに参加させたいので、後ろのコマンドを3台に実施します。
$ kubeadm join <control-plane-host>:<control-plane-port> \
    --token <token> \
    --discovery-token-ca-cert-hash sha256:<hash>
もし、上記joinコマンドを忘れてしまった場合、下記で確認出来ます。
kubeadm token create --print-join-command
8.4. kubectlを通常ユーザで使えるように
通常ユーザでもkubectlを実行できる様に kubeadm init の結果に表示されているコマンドを実行します。
$ mkdir -p $HOME/.kube
$ sudo cp -i /etc/kubernetes/admin.conf $HOME/.kube/config
$ sudo chown $(id -u):$(id -g) $HOME/.kube/config
9. pod間通信用のネットワークアドオン flannel インストール
こちらの手順を実施する。
$ kubectl apply -f https://github.com/flannel-io/flannel/releases/latest/download/kube-flannel.yml
10. 動作確認
上記を実行後にしばらくして、ワーカーノードが Ready になっていればOK。
$ kubectl get nodes
NAME   STATUS   ROLES           AGE   VERSION
rp1   Ready    control-plane   23h   v1.27.4
rp2   Ready    <none>          22h   v1.27.4
rp3   Ready    <none>          23h   v1.27.4
rp4   Ready    <none>          23h   v1.27.4
おわり。
そこそこ面倒だったので、Nixで一発で入れられるようにしたいです。
(ここにほぼ書いてありそうだけど、k8sのお勉強の方を優先しなきゃ…)
おまけ
Wi-FIとBluetooth無効化
/etc/modprobe.d/blacklist-8192cu.confというファイルしかなくて、このファイルをリンク先のように編集したら無効になった。